Christmas Cookies
 Yea, I'm still alive. Been sort of slack about blogging lately though. Works been hectic with the library renovation about to start. We closed on Sat and are now in the process of separating the books into two sections. We only have space for about 25% of our collection in our temporary library and we began the process today of deciding which items will be in that 25%. You can just imagine all the books on the shelves going, "Pick me! Pick me!" Deciding, then moving those books to the temporary library and the remaining 75% into storage will take about six weeks. One day down, five weeks and six days to go.
And while we were getting ready to close, I managed to make Christmas cookies in my new kitchen.....which Jim and I really, really love. I made good use of my new little baking corner and at one point had both my kitchen aid mixers in action. It was cool.
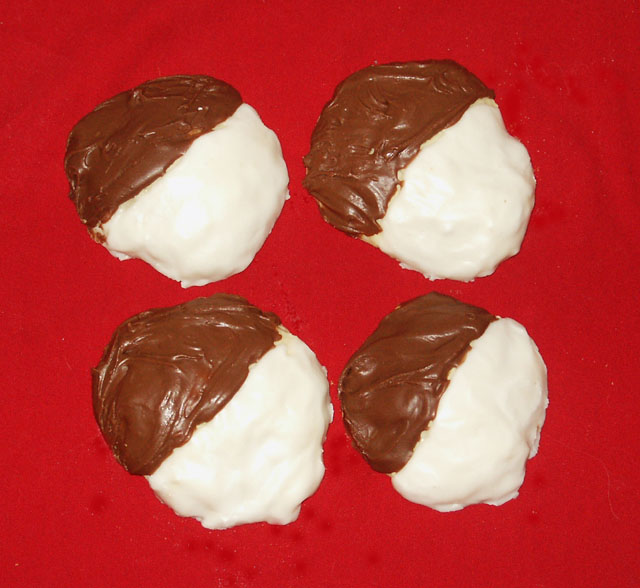
But now on to the cookies! First up are Egg Nog Cookies. (recipe at the end of post)
 This was a recipe I found a few years ago and just now got around to trying. If you like egg nog, you will not be disappointed with these cookies. The icing's even spiked!
Next up are Raspberry Nanaimo Bars. (recipe at the end of post)
 I know most of you are probably asking, "What the heck is a Nanaimo Bar?" Well, I'll tell you. It's a delicious no bake bar cookie that was first made in the small town of Nanaimo, British Columbia, Canada. The original recipe does not use raspberry but after trying both versions, I think the raspberry one is by far the better version. Jim and I actually went to Nanaimo several years ago while on a cruise. It's a pretty place and we have talked about going back some day. But for now, we will have to settle for the Nanaimo Bar.
The third cookie recipe I made is a Date Pinwheel cookie. (recipe to be added later)
 I asked Jim if there were any favorite cookies from his childhood that he'd like make and with little hesitation he said Date Pinwheels. And he even knew what cookbook to find them in, an old one that his mom used for years and gave to him when he left the nest. We still use it every now and then.
And lastly, my favorite cookie to make for Christmas, Italian Tricolors. (recipe at the end of post)
 An almond cake-like cookie with apricot jam in between the layers covered in bittersweet chocolate. Moist, sweet and delish!
Eggnog Cookies with Rum Glaze
2 cups sugar
1 cup butter
1 cup purchased eggnog
1 teaspoon baking soda
½ teaspoon ground nutmeg*
5½ cups all-purpose flour
4 cups powdered sugar
5 to 6 tablespoons purchased eggnog
4 teaspoons dark rum or ¼ teaspoon rum extract
1 teaspoon ground nutmeg
In large bowl, beat sugar and butter at medium speed until creamy. Beat in 1 cup eggnog, baking soda and nutmeg until blended. Gradually beat in flour until well-blended. Cover and refrigerate 1 hour.
Heat oven to 350°F. On lightly floured surface, roll out dough 1/4 inch thick. Cut out with cookie cutters; place cookies on baking sheet. Bake 6 to 8 minutes or until lightly browned on bottom. Cool on wire racks.
Meanwhile, in medium bowl, whisk together all glaze ingredients until smooth. Spread glaze over cooled cookies.
*If desired, a combination of ground cinnamon, cloves and nutmeg can be used.
Makes about 8 dozen cookies
Italian Tri-Colors
1 tube or can (7 to 8 oz.) almond paste
1¼ cups butter (2½ sticks), softened
1 cup sugar
4 large eggs, separated
1 teaspoon almond extract
2 cups all-purpose flour
1/4 teaspoon salt
10-15 drops red food coloring
8-12 drops green food coloring
1 jar (12 oz.) apricot preserves, strained
4 squares (1 oz. each) semisweet chocolate, melted
Preheat oven to 350 degrees F. Grease three 15½" X 10½" jelly-roll pans; line pans with waxed paper, allowing waxed paper to extend over ends of pans. Grease and flour waxed paper.
In small bowl, with mixer at high speed, beat egg whites with ½ cup sugar until stiff peaks form; set aside.
In large bowl, with same beaters, and with mixer at medium speed, beat almond paste and remaining ½ cup sugar until well blended (there will be some small lumps of almond paste remaining). Reduce speed to medium-low; beat in margarine or butter until blended. Beat in egg yolks and almond extract until blended. Reduce speed to low; beat in flour and salt just until combined.
With rubber spatula, fold egg-white mixture into almond mixture, one-third at a time, until combined.
Remove one-third of batter (about 1½ rounded cups) from large bowl to small bowl. Remove half of remaining batter from large bowl to another small bowl. (You should have equal amounts of batter in each bowl.) Stir red food coloring into 1 bowl of batter until evenly blended. Repeat with green food coloring and another bowl of batter.
Spread white (uncolored) batter in 1 jelly-roll pan. With metal spatula (offset, if possible), spread batter as evenly as possible (layer will be about 1/8 inch thick). Repeat with red batter and another pan. Repeat with green batter and remaining pan.
Bake layers 10 to 13 minutes, rotating pans halfway through cooking time, until layers are just set. It is important to undercook this batter slightly to ensure moist cookie layers. (If you don't have enough oven space for 3 pans, you can bake 2 layers at once, and then bake the last layer separately.)
Let layers cool slightly in pans on wire racks, about 5 minutes. Invert layers onto racks, leaving waxed paper attached; cool completely.
When all 3 layers are cooled, remove waxed paper from green layer. Place green layer on serving tray or platter; spread with half of apricot preserves. Place white layer on top of green layer, waxed-paper side up; remove waxed paper. Spread with remaining apricot preserves. Place red layer on top of white layer; remove waxed paper.
With serrated knife, trim edges (about ¼ inch from each side). Spread melted chocolate on top of red layer (not on sides); refrigerate until chocolate is firm, at least 1 hour. If you like, after chocolate has set, cover and refrigerate stacked layers up to 3 days before cutting and serving.
To serve, cut stacked layers lengthwise into 4 strips. Cut each strip crosswise into 12 small rectangles. Store cookies in tightly covered container, with waxed paper between layers, in refrigerator.
Raspberry Nanaimo Bars
Bottom Layer:
1/4 cup (2 ounces) butter
1/4 cup sugar
1/3 cup cocoa powder
1/4 cup seedless raspberry puree*
1 egg, lightly beaten
2 cups graham cracker wafers
1/2 cup finely chopped almonds
1 cup coconut
Place the butter in a medium saucepan, and place it over medium heat until melted. Add the sugar, cocoa powder and raspberry puree and stir until smooth and well-combined. Add the egg and take the pan off the heat, stirring constantly to incorporate the egg. Once the mixture thickens, stir in the graham cracker crumbs, coconut, and nuts. Scrape the mixture into a 9x9 pan lined with aluminum foil, and firmly press it into an even layer.
Middle Layer:
1/4 cup (2 ounces) butter, room temperature
1/4 cup seedless raspberry puree*
3 tbsp instant vanilla pudding mix
2 cups powdered sugar
Cream the butter in a stand mixer. Add the puree, pudding mix, and powdered sugar and beat for several minutes until fluffy and light. Spread the raspberry cream over the bottom layer and refrigerate for 30 minutes.
Top Layer:
6 ounces semi-sweet chocolate chips
1 tbsp cream
1 tbsp seedless raspberry puree*
*To make seedless raspberry puree, blend fresh or defrosted frozen raspberries and pour them through a fine mesh strainer to remove the seeds. Or use a seedless raspberry jam.
Place the chocolate, cream, and puree in a small microwave-safe bowl. Microwave for 45 seconds and stir. If the chocolate is not fully melted, microwave for an additional 15 seconds and stir until melted. Pour the chocolate over the raspberry cream and smooth it into a thin, even layer. Place the bars in the refrigerator until the top layer is set, about 20 minutes.
Labels: cookies
posted by Barbara | 9:38 PM
|
6 comments
![]()
![]()