You Gonna Eat All That?

A fork in one hand, a pen in the other.

My Photo
Name:
Location: Virginia, United States

(Biscuit Girl)

Thursday, May 29, 2008

English Muffin follow-up

Because curious minds wanted to know, these are English muffin rings. I got mine from The Baker's Catalogue. Here's a direct link to the item.
We have really been enjoying a toasted muffin for breakfast in the morning. Jim says a touch of honey is especially tasty. Me, just some butter (or in my case, Smart Balance). And seeing as we are down to two muffins, I may have to make some more this weekend. I plan to make them a little thinner and handle the dough more gently to see if I can get more of the nooks and crannies that make English muffins are famous for. And I will have a new kitchen toy to make them with. What is it? You'll have to come back this weekend to find out.

Labels:

Monday, May 26, 2008

English Muffins

For Christmas, my in-laws gave me a cache of bread baking supplies. Among the lot was a set of eight English muffin rings that until today have sadly sat unused. I looked at several recipes before I settled on one I found by another blogger named Barbara at Wine and Foodies.

It was a very easy recipe to put together. Even though it said to let the dough rise overnight, you can actually cut that time down to 2-3 hours. Cooking them took about 30 minutes (15 minutes per side) but that time may vary depending on your stove.

The only change I'd make to the recipe isto divide the dough into 12 pieces instead of 8. The muffins are really tall like ones you can get from Wolferman's. I think a slightly thinner muffin may be more to my liking but that may change after we give these a taste test in the morning.
English Muffins

2 teaspoons yeast
½ teaspoon sugar
8½ ounces warm water
4¼ ounces warm milk
2¼ cups high grade flour
2¼ cups standard flour
1 teaspoon salt
fine cornmeal

Put the yeast and sugar in a small bowl with half the warm water. Stir and set aside for a few minutes, then add the remaining water and the milk.

Put the flour and salt in a large bowl and use your hand to mix in the yeast, water and milk mixture. Knead the mixture which will be sticky, thoroughly in the bowl (or use the dough hook of an electric mixer).

Cover the bowl with a damp tea towel and set aside to rise until more than doubled in bulk. Although this may take only a couple of hours, the dough can be allowed to rise overnight. Deflate the dough by pulling it away from the sides of the bowl. Lift it out of the bowl and divide into 8 pieces.

Drop each piece on to a tray liberally dusted with rice flour or fine cornmeal and roll them over until well coated. Form each piece into a thick disc.Place the disks on a baking tray and place another tray on top.Leave to rest and rise 20 minutes, then remove top tray.

Place a cast iron griddle or large frying pan over low heat. When only moderately hot place four of the muffins on it and cook for about ten minutes until light beige on the bottom. Turn the muffins over and cook the second side for a similar length of time.
Wrap the cooked muffins in a dry tea towel while you cook the remaining four. Pull apart and eat while still warm.

For toasting pull the muffins apart and toast on both sides.

Labels:

Sunday, May 11, 2008

Schezuan Beef Noodle Soup

Lots of cooking in the kitchen this weekend. As much for the need to eat and prep my Daring Baker's May challenge as it was to relieve stress. While I can't say what I prepped for the Daring Baker's challenge, I can report that we have several containers of strawberry jam that I made yesterday.

Today was the DB prep as well as noodle for some Schezuan Beef Noodle Soup that Jim cooked up. We've only had this dish at restaurants and wanted to make it at home but never found the right recipe. Today while surfing the net, Jim came across a recipe that looked good. Using it and several others he put together a soup that was slap your momma good. I know.....terrible term to use on Mother's Day but it's true, this soup was great! And there is enough leftover for dinner tomorrow night.

To go with it, I also made scallion pancakes, another elusive recipe that I've tried to make several times before with limited success. But after looking at several, I made one that came as close to the real thing as ever.

Scallion Pancakes
2 cups all-purpose flour
1/2 cup warm water
1 tsp salt
1 bunch scallions, finely chopped
vegetable oil

Mix the flour, water and salt in a bowl until a ball is formed. Turn out onto a flat surface and knead for about 5 minutes or until smooth. Add flour or water as needed. Cover the dough and let it rest for 15 minutes.

Unwrap the dough and divide into 6 sections and roll into balls. Keep covered until ready to roll out. One piece at a time, roll out the dough into a circle about 1/8" thick and brush with oil.
Scatter about 1-2 tbsp of the scallions on top of the dough.
Roll up the dough like a cigar.
Then coil it up .Cover and repeat with the remaining pieces of dough. When all are done, take out one piece and roll it out to about 1/8" thickness. (don't worry if it squishes out green onions)Heat a skillet over medium heat with 1 tsp oil. When hot add one pancake and cook until the bottom is golden brown, flip over and brown the other side. Repeat with remaining pancakes. Slice into 4-6 pieces and serve.


Egg Free Chinese Noodles
3 cups all-purpose flour
2 tsp coarse salt
2 tsp corn or peanut oil
1 cup water

Mix all the ingredients and knead by hand for about 5 minutes or until the dough is smooth and elastic. Cover with plastic wrap and set aside for 30 minutes.

Unwrap the dough, cut into 4 equal pieces. Cover set aside. Take one piece at a time and flatten with your hands into a disc. Roll out to a 14 inch square (and less than 1/8" thick), dusting with flour as needed. Move the dough to a cloth or paper towel to dry while you work on the other three pieces.

Taking the first piece you rolled out, liberally dust both sides with cornstarch, smoothing it out with your hands. taking opposite edges, fold the dough into thirds. Using a pizza cutter, slice the dough into even strips about 1/8" in width (or slightly wider if you like). Unroll the noodles by tossing them with your fingers. Spread them out on a cookie sheet to dry for 15-20 minutes. You can cook them at this point or put them in a plastic bag and refrigerate or freeze them.

To cook them: Place in boiling soup or water for about 3 - 4 minutes or until desired tenderness.

Schezuan Beef Noodle Soup
3 1/2 lbs beef short ribs bone-in
2 1/2 quarts water
1/2 cup aji-mirin (or shaoxing and additional brown sugar if needed)
1/2 cup soy sauce
2 tsp five spice powder (or 5-6 whole star anise pods)
2 tsp whole szechuan peppercorns
1 tsp red pepper flakes
4 inch piece of ginger, cut into several pieces and crushed with the back of a knife
6 green onions, green parts chopped, white parts crushed with the back of a knife
6 cloves garlic, crushed with the back of a knife
10 cilantro stems, leaves separated from stem pieces

Soak beef in cold water for 20 minutes to remove blood, then dispose of water
Bring 2 1/2 quarts of water to boil in stock pot.
Add beef, return to boil, skim foam and impurities from surface.
Reduce to simmer, add aji-mirin, soy sauce, five spice powder, szechuan peppercorns, pepper flakes, ginger, white part of green onions, garlic, and cilantro stems.
Simmer for 2 1/2 hours. Remove beef, then strain solids from soup and add soup back into pot. Debone the beef, then remove fat and cartilage and add back into pot.

Return to boil, use soup to cook chinese wheat noodles (store-bought or use recipe here). Also, if desired add steamed greens or use broth to cook baby bok choy or watercress. Serve in soup bowls with cilantro and green onion tops for garnish.

Labels: , , , ,

Friday, February 29, 2008

The Daring Bakers February Challenge

This month's challenge is hosted by Breadchick Mary (The Sour Dough) & Sara (I Like to Cook). Our recipe: Julia Child's French bread.

This is what French bread is supposed to look like:
And this is what mine looks like:

So what would this French bread say if it could talk? My guess is it would say something like, "Don’t' look at me, I'm hideous!" No wait, this is French bread. That means it would say, "Ne me regardez pas, je suis affreux."

When I first saw this month's challenge I thought great, another chance to work on my French bread skills. The recipe looked daunting. Twelve pages in length and a total time of close to 11 hours from start to finish. But this supposed to be a challenge, right? So I carefully studied the recipe before the first scoop of flour was measured.

All seemed to go well….until it came time to move the bread from the floured towels to the cooking sheets. Even with the heavy dose of flour covering the towel, the bread stuck to it and quickly deflated. Phooey! (I actually said something a bit more colorful) One loaf still retained it's loaf shape while the second one simply collapsed upon itself and folded over into a grotesque mass of wrinkly dough. Not a pretty site. In my frustration, I grabbed it up and rolled it into a boule hoping it could be salvaged. The result was mixed. It rose just like it was supposed to.
Taste-wise it was good if not a touch salty. Texture-wise, a nice fine crumb. Looks-wise, hideous. My first (non-obscene) thought was the loaf looked like a Geoduck . See the resemblance?

While my attempt at Julia Child's French bread was not great, it was a learning experience. However, I have other recipes for French bread that are less complicated and take about half the time to make (not including the starter). I think I'll stick to them.

And many thanks to my brother for posting this for me since I will be somewhere in the air on my way to Malaysia on posting day.

Labels: ,

Tuesday, January 22, 2008

French? Oui! Ugly? Oui Oui!

But they tasted great!
I guess I still need to work on my forming technique for these French Baguettes. Ya think?

The recipe was easy enough to put together and the dough felt perfect after it was kneaded. They rose fine.....then it came time to slash them so they would have that nice look French breads have. I have a lame that I've used before to slash dough before baking and it's worked well. Not in this case, the lame dragged through the dough instead of slicing through it like butter. That combined with my poorly formed loaves created the world's ugliest French Baguettes. Where the bread was sliced, it looks twisted and distorted. But like the old saying goes, You can't judge a book by it's cover. And such was the case here. The bread had just the right denseness and chew to it with a slight tang from letting the starter sit at room temperature overnight.

But fear not mon ami, I am not one to give up easily. Someday, after a little more practice. I will make pretty baguettes.

French Baguettes
For the starter:
1 1/2 cups bread flour
3/4 cup cool (room temp) water
1/8 tsp instant yeast

Combine the flour, water and yeast together and mix until well blended. Let it rise, covered in a medium to large container, at room temperature for 12-18 hours. It is ready to use once it forms a nice dome and looks airy and bubbly. It will also have a slightly sour smell to it (which is good).

For the dough:
2 1/2 cups bread flour
1 tsp instant yeast
2 tsp. salt
the starter
3/4 cup cool water

Place the flour, yeast ans salt in the bowl of your mixer. Pour about half of the water around the edge of the starter to loosen it from it's container. Pour the starter and the water into the mixer bowl. Use the flat paddle of the mixer to slowly mix the dough until it comes together and no longer sticks to the sides of the bowl, about 3 minutes. If needed, add a little flour or water to help the dough form. Stop the mixer and switch out the flat paddle with the dough hook. Knead the dough on medium speed for 4 minutes. Stop the mixer halfway through to clean off the dough hook.

Let the dough rise. You can keep it in the mixer bowl or use a lightly oiled dough rising bucket, but either way, cover it. Leave it for 2 hours, checking after the first hour to fold over the dough onto itself.

Once risen, divide the dough into three equal pieces and shape into logs. Let them rest, covered, for 20 minutes then shape them into baguettes (slightly tapered at the ends). Proof the baguettes for 30-40 minutes in a baguette pan, if you have one. If you don't, placed rolled up kitchen towels in between the loaves and on the outer edges to help them keep their shape.

Preheat the oven to 500 degrees. Once the dough is ready to bake, slash the tops several times with a bread lame or sharp knife. Spritz the bread with water. If you aren't using baguette pan, place the loaves on a cookie sheet. Place the loaves in teh oven and reduce the heat to 475. Bake the loaves for 18-24 minutes or until they are golden brown. Cool on a baking rack.

Labels:

Saturday, January 05, 2008

Challah Bread

Feeling better from the disc problem in my neck, I'd been anxious to get back into the kitchen and bake. The only major obstacle I had was not being able to move my Kitchen Aid mixer from the cabinet up to the counter top as my doc won't let me lift more than 10 pounds. And that mixer is a heavy beast.

Mom is still here helping us out while I'm healing up or should I say she's trying to keep me from over doing things. I'm not a good patient and have been keeping her and Jim on their toes. But today I had Jim hoist the mixer onto the counter and they turned me loose in the kitchen......whee!

I had three recipes in mind. One was the challah bread, another was a burnt sugar pound cake using some of my newly acquired vanilla beans and the last one was some dog biscuits for Miss Sophie and her Tennessee cousins that would be safely transported home via mom.

The challah bread was so easy to put together. I was only worried about how well I'd braid the dough. But not to fear....with mom holding one end of the dough, I braided with ease.We haven't had any yet and how we've managed not to tear into it is still a mystery. But have no doubt, there will be some French toast made with it tomorrow or Monday.
Challah Bread Recipe
4 cups unbleached bread flour

2 tbsp. sugar

1 tsp. salt

1
1/3 tsp instant yeast
2 tbsp. vegetable or canola oil

2 large eggs, slightly beaten
2 large egg yolks, slightly beaten

3/4 cup + 2 tbsp. water

2 egg whites, whisked until frothy
Sesame or poppy seeds for garnish (optional)


Stir together the flour, salt, sugar, and yeast in the bowl of your mixer. In a separate bowl, whisk together the oil, eggs, and yolks, 3/4 cup + 2 tbsp. water. Pour the egg mixture into the flour mixture. Mix on low speed with the paddle attachment until all ingredients gather together and form a ball. Add more flour or water if needed.


Switch out the paddle attachment for the dough hook and knead the dough on medium speed for about 6 minutes, sprinkling in more if needed to make a supple , but not sticky dough. (it may feel slightly tacky to the touch)


Lightly oil a large bowl (I use a rising bucket with a lid that seals). Form the dough into a ball and place it in the oiled bowl. Roll it around a little to coat it with the oil. Cover and let it sit at room temperature for 1 hour.


Remove the dough from the bowl and knead for 2 minutes to degas. Re-form the dough into a ball and place it back into the bowl, cover and let sit again at room temperature for another hour. It should grow to 1 and 1/2 times it size.


Remove the dough from the bowl and divide it into three equal parts. Form each into a ball, cover with a towel and let rest for 10 minutes.
Roll out all three pieces into equal length strands, thicker in the middle and slightly tapered at the ends. Braid them, tucking in the ends underneath. Line a cookie sheet with parchment paper and transfer the bread to the pan. Brush the loaf with the egg whites then mist it with spray oil. Cover it loosely with plastic wrap.

Proof the bread at room temperature for 60-75 minutes or until the dough grows to 1 and 1/2 its original size.
Preheat the oven to 350 with the oven rack placed on the middle shelf of the oven. Brush the loaf again with the egg whites and sprinkle on the sesame or poppy seeds if you are using them.

Bake the loaf for 20 minutes then rotate the pan 180 degrees and continue baking for another 20-25 minutes. When done the bread will have a rich golden color and when probed with a thermometer will read to 190 degrees in the center. Transfer the bread to a cooling rack for at least one hour before serving.

Labels: ,

Wednesday, November 28, 2007

Daring Baker's November Challenge - potato bread


(by Biscuit Boy)
Barbara is out of commission right now due to a serious pinched nerve in her neck. I'll be posting for her on our vacation over the next couple of weeks, and hopefully she'll be back after that. In the meantime, here is a picture of her potato bread done as part of the Daring Baker's group.

She also made potato rolls as well. They weren't as photogenic as the bread, but they were just as tasty. We shared these with our friend Beth, who pronounced them delicious. It was also good toasted, and slathered with mustard for a ham sandwich.
For recipe and other information, check the Daring Bakers Blogroll.

Labels: ,

Tuesday, September 11, 2007

Nice Buns!

Anytime I need to relax, I bake. And last weekend after another stressful week at work I found myself looking through my recipes for something to bake. My choice: Hamburger Buns. I took this recipe from fellow blogger Joe from Culinary in the Country.

They are super easy to make and took less than three hours from start to finish. Tonight we're having them with some veal florentine burgers. Last night Jim had one with some left over pork stew he made (which was delish but we forgot to get pictures).

These are the plain buns:

These are the seeded ones:And lastly, here is the recipe:
Hamburger Buns

1 cup milk
1 cup water
2 tablespoon sugar
2 tablespoons butter
1 1/2 teaspoon salt
5 1/4 cups all-purpose flour, divided
2 1/4 teaspoons instant yeast
Egg wash( 1 large egg yolk + 1 tablespoon water)

In a small saucepan, add milk, 1 cup water, sugar, butter and salt. Heat over low just until the butter melts - cool to lukewarm.

In a medium bowl, whisk together 3 cups flour with the yeast.

Pour the milk mixture into a large mixing bowl. Mix in the flour/yeast mixture, 1 cup at a time, until all 3 cups are in, and beating until smooth. Stir in enough of the remaining flour to make stiff dough.

Scoop the dough onto a lightly floured surface. Knead until smooth and elastic (about 8-10 minutes), adding enough of the remaining flour to prevent the dough from sticking to your hands. Move dough into a large bowl lightly coated with cooking spray. Cover and let rise until doubled, about 60 minutes.

Uncover and punch down the dough. Evenly divide into 12-16 pieces, depending on how large you want the buns to be. Form each piece into a tight ball and place about 2" apart on a parchment lined baking sheet - you may need to use 2 sheets depending on the size. Slightly flatten each ball. Cover and let rise until doubled - another 30 to 45 minutes.

Preheat oven to 400. In a small bowl, whisk together egg yolk and water. Gently brush egg wash over each bun.

Bake about 20-25 minutes, until golden and they sound hollow when tapped on the bottom. Transfer to a wire rack and cool completely.

Labels: ,

Wednesday, May 30, 2007

Bialy Recipe and Pictures

Oops! Meant to post the pictures on Monday night. Better late than never!
The bialy's turned out great. Light and airy with just a touch of chewiness to them. We couldn't resist ourselves and split one while it was still warm, slathered on some butter and devoured it.


The remaining ones will be breakfast the rest of the week. It's gonna be a good week.
These are the bialy's before they were baked.

These are the bialy's just after I took them out of the oven. Don't they look good enough to eat?

I did make two changes to the original recipe. First, I reduced the quantity from 2 dozen to 1 dozen. This produced a nice sized bialy. Making 2 dozen made ones that were too small for me. Second, even though it's still listed in the ingredients, I omitted the salt from the topping. I simply didn't care for it as I'm used to just having the onion and poppy seed taste.

The only other thing I would add is that during the step where you make the indentation in the center, be sure you press down firmly. I gave it a nice push but as you can see in the pictures, it puffed back up. You want a nice flat center so the poppy seeds and onion have a little nest to sit in when they are baked.

Now, go make yourself some bialy's.


Bialy recipe - Makes one dozen

Filling:
2 tablespoons onion flakes
2 teaspoons poppy seeds
1 tablespoon vegetable oil
1 teaspoon salt

Dough:
4½ cups bread or all-purpose flour
5 teaspoons sugar
2 teaspoons salt
1 package dry yeast
1¾ cups hot water (about 110 degrees F)
1 baking sheet, sprinkled with cornmeal or covered with parchment paper

To make the filling, soak the onion flakes in water for about 2 hours. Drain and press out the water with a paper towel. If the onion flakes are coarse, mince fine in a food processor or blender. Combine in a bowl with the poppy seeds, oil, and salt, and set aside.

To make the dough, measure 3 cups flour into the mixing or mixer bowl and add the dry ingredients. Stir to blend. Form a well in the flour and pour in the hot water. With a wooden spoon pull the flour from the sides into the middle and beat until a medium batter. If using a mixer, attach the flat beater and, with the machine running, pour in the hot water. Add flour, 1/4 cup at a time, until the batter becomes a rough but elastic dough. Attach the dough hook, if using the mixer.

Turn the dough from the mixing bowl and knead with strong push turn-fold strokes; crash the dough down against the work surface occasionally to help develop the gluten. If the dough is sticky, dust with sprinkles of flour. If under the dough hook, the dough will clean the sides of the mixer bowl and form a ball around the hook. If it persists in sticking to the sides, add small portions of flour while the mixer is running. Knead for 10 minutes, until the dough is smooth and elastic when stretched.

FIRST RISING: Place the dough in a greased bowl, cover with plastic wrap, and set aside to double in volume at room temperature, about 1 hour.

SECOND RISING: With your fingers or fist punch down the dough, re-cover, and let double in volume again, about 45 minutes.

SHAPING: Take the dough from the bowl and divide into 4 equal parts. Divide each part into 6 pieces. Roll each piece into a tight ball under a cupped palm. Let the balls rest for 10 minutes under a length of wax paper or a cloth.

With hard blows of your palm or under a rolling pin, shape each ball into a 4 inch circle, about ½ inch thick. Place on the prepared pan.

THIRD RISING: Cover the circles with wax or parchment paper and put aside to rise to slightly less than double, 30 minutes. A baker would say "three-quarter proof."

FILLING: With care not to deflate the outer part of the bialy, push a deep depression in the center with the thumbs. Stretch the dough uniformly outward until the well is at least 1½ inches across, and thin on the bottom. Place about ½ teaspoon of the onion filling in the well.

FOURTH RISING: Cover the bialys with wax paper and allow them to rise until almost doubled, about 25 minutes.

While the bialy’s are rising, preheat the oven to 450 degrees F 20 minutes before baking.

BAKING: Place the bialys on the middle shelf of the hot oven and bake until a light brown, about 15 minutes. Place the baked bialys on a metal rack to cool.

Labels: ,

Monday, May 28, 2007

Bialy's

Sorry for the long delay in posting since we returned from vacation. Between work and visiting family, I just haven't had the time. I plan to do better now that things are settling back to a normal pace.

Today I am trying my hand at a bialy recipe I first made two weekends ago. I found the recipe in a cookbook that was on our shelves in the library. I picked the book off the shelf, opened it up and there in front of me was a recipe for bialy's. Now there's a sign if I ever saw one. I love bialy's but trying to find a good one in these parts isn't as easy as you would think. They're not as popular as their cousins, the bagel and few places carry them (or if they do, have ones that even come close to the ones I used to get in NY).

I scanned the recipe and it looked promising so while my mom was here we tried our hands at making a batch. They turned out ok but were way too small. The recipe said to divide the dough into 24 pieces. But other than that, the taste and texture was dead on. The only changes I would make is to reduce the number it makes to 12 and to cut back on the cooking time.

I've got a batch in their final rising right now and they look perfect. Once the oven heats up, I'll pop them in for about 15 minutes or until they look done, Then let them cool before we eat them (which is so hard to do with fresh baked bread).

I'll up date the post this evening with some pictures of the finished bialy's.

Labels:

Sunday, February 18, 2007

New York Bagels, Kaiser Rolls and Salt Sticks

I'm in Knoxville this weekend visiting my family and whenever we get together, food is high on the list of things we do. Whether it's getting everyone together to eat at a restaurant or at home, we always find time to spend over a plate of food. This trip, instead of cooking a big meal together, we baked bread. Specifically bagels, kaiser rolls and salt sticks.

Having New York roots, bagels are one of those foods for which there is only one true 'bagel'...a good NY deli bagel. Crusty, chewy and dense. Not like the ones you find in the freezer case at the stores or in the bread aisle which are usually light and fluffy. Blech.....

Finding a true NY style bagel is pretty hard to do in Tennessee and for that matter, not much in where I live in Alexandria has met my standards yet. But after reading several other fellow bloggers rave about the bagel recipe in The Bread Baker's Apprentice, I was curious enough to check it out. I got a copy of the book from the library (not hard to do since I work in one) and looked over the book. The first part of it is filled with basics of bread baking and I learned quite a few things. I also liked the look of the bagel recipe and about a dozen others so I went out and bought the book. That was a year ago. The poor book has been sitting on my cluttered bookshelves until just recently when I thinned out the collection.

Intrigued by my semolina bread, my brother and sister were interested in baking some bread this weekend when I came down to visit and I knew immediately that bagels would be on the list of breads to make. I also scanned a Kaiser roll recipe in the book and threw that one in the mix as well. My dad's favorite breakfast is fried egg on a kaiser roll and I wanted to see if I could re-create an authentic roll for him.

My brother and sister came by our mom's house yesterday around noon and we baked until close to 7:00. We had baked 8 salt sticks (which we also call snake sticks) and 8 kaiser rolls. We put together a starter for the kaiser recipe but decided to try another recipe my sister found that was for the salt sticks and kaisers, a two-fer! While on the small side, the taste was there. Next time instead of the dough being divided into 16, we'll divide it in 8 and just make salt sticks.

And we had two dozen bagels were sitting in the fridge awaiting a nice hot water bath the next morning before being popped in the oven. A sample bite of a salt stick and a kaiser left us pleased with our handiwork. We couldn't wait until breakfast. This morning we finished making the bagels and could hardly wait for them to cool before we tore into one, slathered it with butter and grunted our approval. These were NY bagels and they were damn good!

But we still had the starter in the fridge from the first Kaiser recipe. I decided to go ahead and make the rolls so we could compare the two recipes. I made them bigger as well so a whole fried egg can easily sit on the roll. They came out really nice and smell wonderful but we will wait til tomorrow morning to try them If I can wait that long.
As soon as I get home, I'll try to get the recipes posted as well.
Here are some more pictures of the bounty we baked:
Salt Sticks (aka Snake sticks)
Kaiser Roll

Bagels

Labels: , , ,

Sunday, February 11, 2007

Semolina Bread

I just made the best looking bread ever! I was doubting myself there for a while but I kept going and when the dough was finally kneaded I knew I was on to something good. And this bread kicks ass.

Many years ago when I lived in Nashville, I discovered sesame semolina bread. It was love at first buttery bite. And every now and then I still get a craving for it. My most recent craving was sparked last while I was trying to get over a nasty little cold. I wanted something bready but couldn't quite put my finger on what I wanted. That's when I saw a picture of semolina bread called Pane Siciliano in The Bread Baker's Apprentice. That was all I needed to get the gears in motion. On Friday I was finally back among the living and we were in need of groceries so I headed to the store. One my list, semolina flour.

Last night I began to really look at the recipe for and realized it was going to take 3 days to put together. Rats. I didn't have have three days but I did see another recipe online that only took 2 days. So I struck a compromise by using the recipe for the 2 day version but shaped the bread like the Pane Siciliano.

But I wasn't quite sure how it would turn out when I first started. For one thing, the started didn't look right. It was too firm not loose like the recipe called for but I went ahead and set it to rest overnight anyway. By morning, it was about three times it's size but still looked too dense. I still plowed ahead and once I had the dough mixed and partially kneaded in my mixer, I turned it out onto the counter and began to knead it by hand. I knew almost immediately that what I had was spot on. After a few minutes of kneading I had what was just about the most perfect dough I've ever put together, silky smooth and elastic. An hour of rising provided me more confidence that the bread was going to turn out good. I punched it down, divided it into 4 parts and rolled it out, rolled it up then coiled it from opposite ends to form an "S".

Two loaves got egg washed and sprinkled with sesame seeds and the other two just got egg wash. A second rising and then they were baked.


The result: amazing! Half of one sesame loaf is already gone. Thankfully I now have starter on hand so I can make more in just one day!

SEMOLINA BREAD

Starter
1/4 cup warm water (105°F. to 115°F.)
1/4 teaspoon dry yeast
3/4 cup plus 4 teaspoons water, room temperature
2 1/2 cups unbleached all purpose flour

Bread
2 1/2 cups warm water (105°F.°F. to 115°F.)
2 1/2 teaspoons dry yeast
3 3/4 cups unbleached all purpose flour
3 3/4 cups finely ground semolina flour
2 teaspoons sea salt
Additional semolina flour

For Starter:
Combine 1/4 cup warm water and yeast in medium bowl. Let stand until yeast dissolves, about 10 minutes. Stir in 3/4 cup plus 4 teaspoons room temperature water. Add flour in 3 additions, stirring well after each addition Stir until mixture has consistency of thick sticky dough, about three minutes. Light oil large bowl. Transfer starter to a bowl. Cover with plastic; let rise at cool room temperature until tripled in volume (starter will be slightly wet and thick), at least 6 hours and up to 24 hours. (Can be made 5 days ahead. Stir down starter, cover and chill. Bring to room temperature before using.)

For Bread
Pour 2 1/2 cups warm water into large bowl of electric mixer fitted with paddle attachment. Sprinkle yeast over; let stand until dissolved, about 10 minutes. Measure 2/3 cup starter (reserve remainder for another use). Rub between fingers, allowing starter to drop into yeast mixture (starter will be stringy). Beat until some of the starter dissolves. Combine flour, 3 3/4 cups semolina and salt in large bowl. Add to yeast mixture in 3 additions; beat until incorporated. Turn out unto floured surface; knead until smooth and elastic, about 6 minutes.

Oil large bowl. Transfer dough to bowl, turning to coat with oil. Cover bowl with plastic. Let rise in warm draft-free area until doubled in volume, about 1 hour.

Butter 2 heavy large baking sheets. Punch down dough. Divide into 4 pieces. Cover 3 pieces with clean towel. Roll remaining piece on floured surface to 14x8 inch rectangle. Starting at 1 long edge, roll up dough jelly roll style. Press ends and seam to seal. Coil the dough from opposite ends in opposite directions to form an "S" , repeat rolling and shaping with remaining dough pieces. You can apply an egg wash and cover the bread with sesame seeds if you like.

Cover shaped dough with clean towel. Let rise in warm draft-free area until doubled, about 45 minutes. Preheat your oven to 450°F. If you are using baking stones, let them sit in oven for 30 minutes once it reaches 450 to assure even heating.

Place 1 baking sheet on each stone. Bake until bread is golden brown and sounds hollow when tapped on the bottom, alternating sheets between racks halfway through baking, about 25 minutes. Cool bread on racks. Makes 4 small loaves.

Labels: ,

Sunday, November 26, 2006

Seared Ahi Tuna and more No-Knead Bread

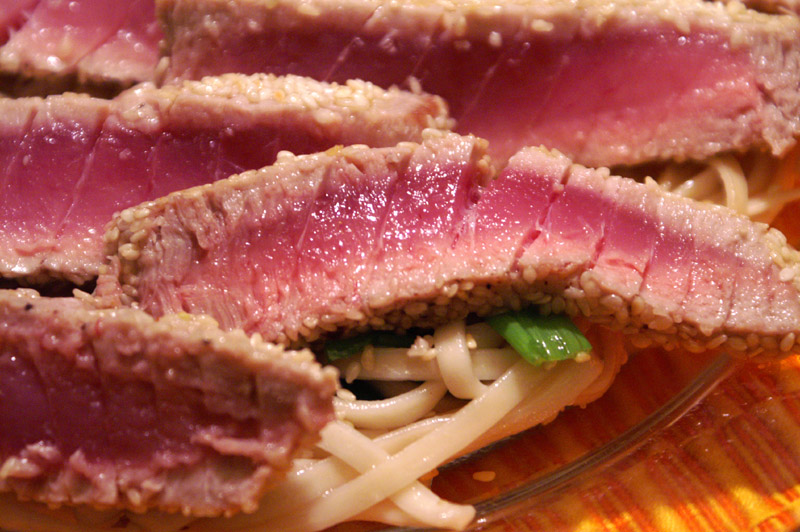
While out shopping today I came across a package of fresh ahi tuna that screamed at me to take it home. So I did. And tonight we dredged each piece in sesame seeds, pan seared them for 2 minutes per side and ate them. *burp* They were delicious.

Jim was the chief cook tonight, I merely provided the tuna. He sauteed some stir fry noodles with garlic and green onion and put a some on each plate. Then he carefully sliced the seared tuna and placed each fillet on top of the noodles.
Simple and delicious. Even Sophie enjoyed a nibble or two.

Coming up this week I'll be off from work (woo hoo!) so I'll have time to tinker in the kitchen. There'll be more no-knead bread for certain. The last loaf I made yesterday didn't stand a chance.
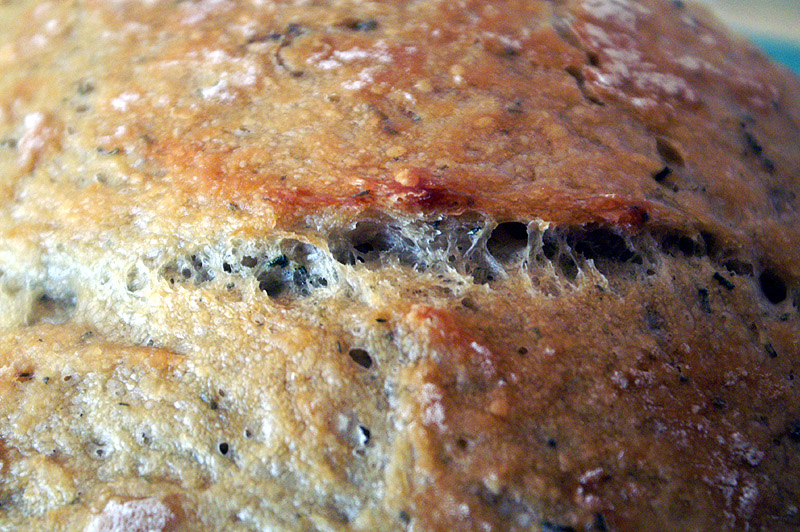
We ate most of it before it had a chance to cool. This loaf was slightly different. I added some freshly ground rosemary and dried onion and added it to the flour mixture before I added the water. And who knows what I'll do with the next loaf...... Then later this week Jim's parents and brother are driving up for a belated Thanksgiving visit. We'll have a family Thanksgiving dinner then. On the menu, brined turkey breast, wild mushroom risotto, green beans and fresh baked bread. We'll probably also make a pizza or two on one other night as well as going out. So stay tuned.......

Labels: , ,

Saturday, November 25, 2006

No need to Knead

Like so many other food bloggers, I have been intrigued by the No-Knead bread recipe that appeared in the New York Times recently. It's taken me a little longer to actually making this bread because my schedule at work has been a bit nutty. I've taken off the entire week after Thanksgiving and now find plenty of time on my hands to get back in the kitchen. And this makes me very happy. :)

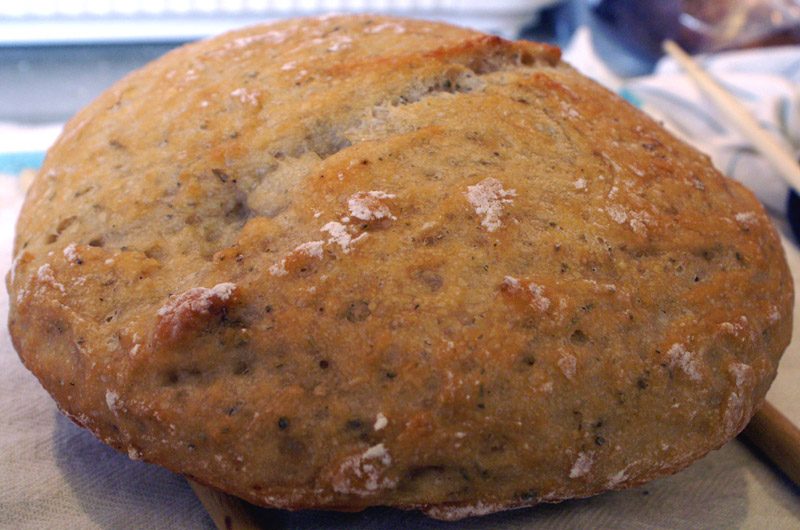
On Thursday afternoon I put up my first batch of no-knead bread. 18 hours later, (yesterday morning) I followed the instructions and gently folded the bread over on itself and let it sit for 15 minutes. The nest step was to gently form the dough into a ball and place it seam side down on a floured towel. This is where I think I goofed. I accidentally dropped the dough onto the counter. The gentle thump of soft dough may have been enough to stop any chance of it rising. After letting it sit for two more hours, the bread hadn't changed much. Oh well, we'll just have a smaller loaf than I planned on. I had no doubt we'd still eat it no matter what it looked like.
And this is what the final result looked like. The crust was beautiful and crunchy just the way I like it. Inside was pocketed with nice airy holes here and there and the texture was just chewy enough. Yum!

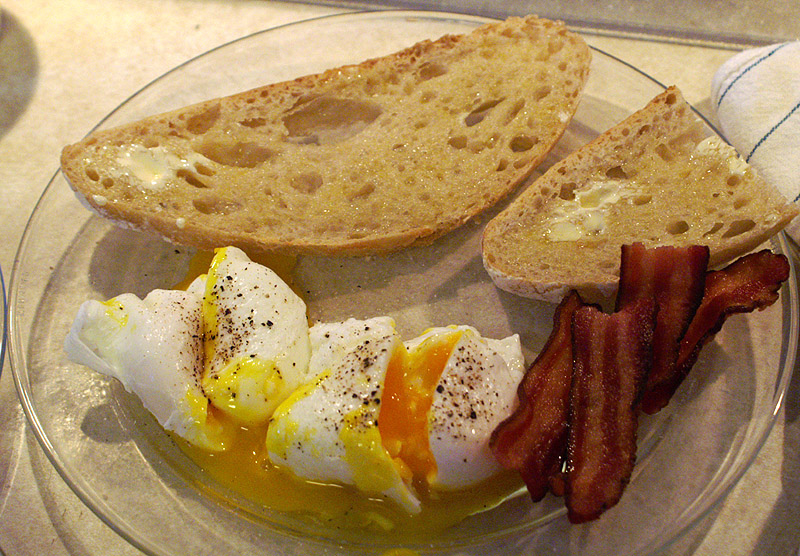
I was so intrigued by this recipe that I went and put up another batch to bake today. And I took a cue from Kitchen Monkey who added some spice and flavorings to his bread with great success. My added flavoring of choice was some dried rosemary and dried onion. I ground each pretty much to a powder and added it to the initial flour, salt and yeast mixture. Later today, I'll have to post on the results. But for now, here's how we made use of our first loaf.......Poached eggs with bacon and toast.
Is that a beautifully poached egg or what? Jim's been enjoying poaching eggs and is really getting good at it.

Labels: ,

Friday, January 06, 2006

Friday Night Splurge

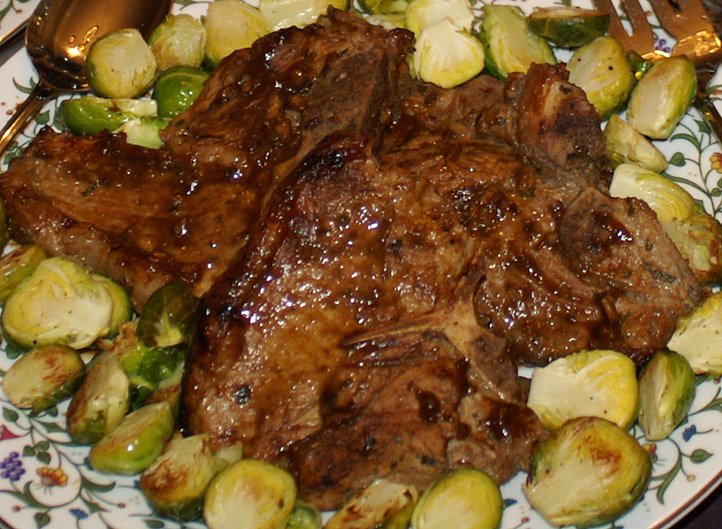
I was off from work today so I had time to work on a nice dinner for tonight. On the menu: Mongolian Barbequed Veal Chops, Roasted Brussels Sprouts and freshly baked Tuscan Bread. Earlier this week I tried (unsuccessfully) to make a loaf of bread. I was inspired by Joe over at Culinary in the Desert. Everything was going fine until I had to transfer the risen dough from a towel onto the pizza stone in the oven. I won’t go into details but let’s just say that I was going to modify the recipe the next time I made it. No more raising the dough in a towel. That sucker was going to rise on a cookie sheet which will all get put into the oven.

So
today, I tried out the recipe with my revision and so far so good. The bread is baking in the oven as I type and the house smells wonderful. And no, it didn’t collapse.

The recipe for the veal chops came from an old Gourmet magazine that we were getting rid of at the library. We only have room to keep so many back issues of magazines so every January we have to clean out the oldest issues in order to make room for the new year. Magazines like Gourmet and Bon Appetit are usually kept for two years. Most of the recipes are usually online these days so keeping eons of issues isn’t needed.

So the kitchen table in the staff break room is now overflowing with 2004 issues of Gourmet, Cooking Light, Bon Appetit, and Southern Living. For a recipe hound like me, it’s like hitting the mother lode. Lunch is now spent with co-workers noses buried in old magazines. An occasional ooh is overheard and everyone pops their head up to see who it came from. Going through everyone’s mind are thoughts like: Have they found a recipe we might want? Have I looked at that issue yet? She is going to tell us what she found….isn’t she?


It on one such a lunch break that I found the recipe that is going to be tonight’s dinner. It jumped out at me with the title alone…..Mongolian Barbequed Veal Chops….. It sounded exotic, it had veal, it made me drool. As I ooh’d, heads popped up to see what I had discovered. I read aloud the name of the recipe. Heads went back into the magazines. Ugh.....I work with a bunch of veal haters. Yes, I know the controversy about veal, but come on guys, the recipe looks great……

The Brussels sprouts recipe came from a coworker who made them for Christmas. She said even her Brussels sprouts hating brother liked them. Good enough for me. So she told me the recipe which a scribbled on the back of the veal recipe.

Ah, time to check the bread……. Wait right here, I’ll be right back….
Tick
Tock.....

Tick
Tock....
The bread turned out great! Nice and golden brown and has a good solid hollow thump when you tap on it. Now all I have to do is keep myself from cutting off a slab while it’s still hot and slathering it with butter. I’m gonna be good and wait until dinner. Aw, screw it, I’m weak and I want some bread.

The veal chops turned out nicely as well. The flavors were well balanced but I think that letting them marinate longer wouldn't have done them any harm. That would have let the marinade flavor the meat even deeper. But that's not to say we didn't like them. Biscuit Boy devoured his in no time flat and shared (somewhat reluctantly) a second one with me. You could definately taste sesame oil, garlic and ginger with the underlying flavors of the soy sauce, hoisin and Sriracha. This marinade would certainly go well with chicken, duck or any tender cut of beef.

The Brussels sprouts were slightly disappointing. They were dry and didn't pick up much of the flavors from the marinade. We still ate them (including Biscuit Pup who is quite fond of cabbage) but I'll definately change up the recipe next time.

Lastly the bread was scrumptious. I hate to admit it but we ate almost half the loaf at dinner! A slice here, a slice there and before we knew it, the half we brought to the table was nearly gone. Needless to say, we liked it.

And the best part of it all is that we had enough of everything leftover and Biscuit Boy will eat like a king for lunch tomorrow. Lucky so and so.


Mongolian Barbequed Veal Chops
Serves 4
Marinade:
1/4 cup finely chopped shallot (about 1 large)
1/4 cup salted roasted peanuts, finely chopped
3 cloves garlic, minced
2 1/2 tsp. minced fresh ginger
1 tbsp. coarsely chopped fresh cilantro
1/4 rice wine vinegar
2 1/2 tbsp. soy sauce
2 1/2 tbsp. sesame oil
2 1/2 tbsp. plum sauce
2 1/2 tbsp. mild honey
2 1/2 tbsp. hoisin sauce
2 tsp. Sriracha sauce or other hot chili sauce

For the veal chops:
4 (1 inch thick) veal rib chops (about 14 oz each)
1/2 tsp. salt
1/4 tsp. black pepper

Stir together all the marinade ingredients in a bowl until combined well.
Place the veal chops in a large zipper seal bag and pour marinade over them. Seal the bag, getting out as much air as possible and place in the fridge, marinade for at least 8 hours, turning the bag over occasionally.

Bring the chops to room temperature, about 30 minutes. Remove them from the marinade and transfer to a platter. Pour the marinade through a fine mesh sieve into a 1 to 1 1/2 quart saucepan, discarding solids. Bring to a boil and boil 1 minute. (I found that I needed to add a little more of the liquid ingredients)

Heat a ridged iron skillet on medium high. Sprinkle chops with salt and pepper. Sear chops in skillet, turning over once, about 6 minutes total. Turn heat to medium and baste occasionally. Place a probe thermometer into the thickest part of one of the chops and continue cooking until it reaches 140 degrees.


Oven Roasted Brussels sprouts
20 Brussels sprouts, cut in half
1/4 olive oil
2 -3 cloves of garlic, chopped
Juice of 1 lemon

Place everything in a zipper lock bag and marinate for 30 minutes. Preheat the oven to 400. Place the sprouts on a baking sheet and roast for about 20 minutes or until tender.


Tuscan Bread
2 packages dry yeast
1 1/4 cups warm water
1 tsp. sugar
2 1/4 cups white flour
1/4 cup whole wheat flour*
1/2 tsp. salt

In a large bowl, dissolve the yeast in the water with the sugar. Mix the 2 flours and the salt. Stir them into the yeast mixture to make a soft dough. Knead 10 minutes by hand. Place the dough in an oiled bowl, cover tightly with plastic wrap and let rise until doubled in bulk.


Rub 2 to 3 teaspoons flour on a baking sheet. When the dough has completed its rising, punch it down, turn it out onto a floured work surface, and flatten it into an oblong about 8 inches X 10 inches and 1/4 inch thick. It will still be very soft, but try to use a minimum of additional flour in handling it.

Roll the dough tight, jelly-roll fashion, into a cylindrical shape. Flatten this to about 1-inch thick and roll it again.Tuck both ends of the cylinder under to meet in the center, pinching to seal them. Roll the dough around the work surface under your hands, to shape it into a smooth ball about 5 inches in diameter.

Set the loaf on the floured baking sheet and place a towel loosely over it. Put the covered loaf in a warm place to rise for 1 hour.

Preheat an oven lined with baking tiles or a pizza stone to 400 degrees F. Have a water-filled sprayer handy. Slide the baking sheet onto the stone. Spray water into the oven before closing the door, and spray twice more at 2-minute intervals. Bake for 50 minutes or until golden brown. Makes 1 Loaf


* I didn’t have any wheat flour on hand so I used rye flour.

Labels: , , ,